初版2011/12/22:最終更新日2011/12/22
HttpServletを作成する
Eclipse4.3で動的Webプロジェクトを作成し、Servletを作成します。
プロジェクト名を適当に入力し、ターゲット・ランタイムは「Apache Tomcat v5.5」としています。
「次へ」を押下後、もう一度「次へ」を押下します。するとコンテキスト・ルートとコンテンツ・ディレクトリーが設定できるので今回はデフォルトのままとします。
HttpServletを継承したTestServletは以下のように作成されます。doPostメソッド内は適当に記述しています。
プロジェクト名を適当に入力し、ターゲット・ランタイムは「Apache Tomcat v5.5」としています。
「次へ」を押下後、もう一度「次へ」を押下します。するとコンテキスト・ルートとコンテンツ・ディレクトリーが設定できるので今回はデフォルトのままとします。
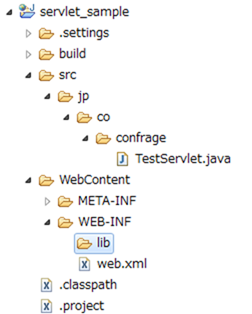
ディレクトリ構成
HttpServletを継承したTestServletは以下のように作成されます。doPostメソッド内は適当に記述しています。
package jp.co.confrage;
import java.io.IOException;
import javax.servlet.ServletException;
import javax.servlet.http.HttpServlet;
import javax.servlet.http.HttpServletRequest;
import javax.servlet.http.HttpServletResponse;
/**
* Servlet implementation class TestServlet
*/
public class TestServlet extends HttpServlet {
private static final long serialVersionUID = 1L;
/**
* @see HttpServlet#HttpServlet()
*/
public TestServlet() {
super();
// TODO Auto-generated constructor stub
}
/**
* @see HttpServlet#doGet(HttpServletRequest request, HttpServletResponse response)
*/
protected void doGet(HttpServletRequest request, HttpServletResponse response)
throws ServletException, IOException {
// TODO Auto-generated method stub
}
/**
* @see HttpServlet#doPost(HttpServletRequest request, HttpServletResponse response)
*/
protected void doPost(HttpServletRequest request, HttpServletResponse response)
throws ServletException, IOException {
request.setCharacterEncoding("windows-31j");
String input = request.getParameter("input");
response.setContentType("text/html; charset=windows-31j");
PrintWriter out = response.getWriter();
out.println("<html>");
out.println("<head><title>test</title></head>");
out.println("<body>");
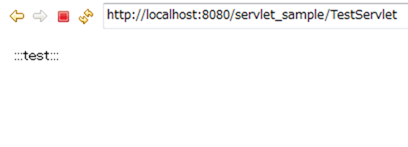
out.println(":::" + input + ":::");
out.println("</body></html>");
out.close();
}
}
web.xmlが作成される
Servletを作成すると自動的にweb.xmlが作成されます。
以下のようになります。
もちろんこれは変更することが可能です。
以下のようになります。
<?xml version="1.0" encoding="UTF-8"?>
<web-app id="WebApp_ID" version="2.4"
  xmlns="http://java.sun.com/xml/ns/j2ee"
  xmlns:xsi="http://www.w3.org/2001/XMLSchema-instance"
  xsi:schemaLocation="http://java.sun.com/xml/ns/j2ee http://java.sun.com/xml/ns/j2ee/web-app_2_4.xsd">
    <display-name>servlet_sample</display-name>
    <servlet>
        <description>
        </description>
        <display-name>TestServlet</display-name>
        <servlet-name>TestServlet</servlet-name>
        <servlet-class>jp.co.confrage.TestServlet</servlet-class>
    </servlet>
    <servlet-mapping>
        <servlet-name>TestServlet</servlet-name>
        <url-pattern>/TestServlet</url-pattern>
    </servlet-mapping>
    <welcome-file-list>
        <welcome-file>index.html</welcome-file>
        <welcome-file>index.htm</welcome-file>
        <welcome-file>index.jsp</welcome-file>
        <welcome-file>default.html</welcome-file>
        <welcome-file>default.htm</welcome-file>
        <welcome-file>default.jsp</welcome-file>
    </welcome-file-list>
</web-app>
上記からjp.co.confrage.TestServletにマッピングされているURLが/TestServletであることがわかります。もちろんこれは変更することが可能です。
WEB-INF配下にindex.jspを作成する
Servletの動作確認するためにindex.jspを作成します。このjspからPOSTし、Servletの動作を確認します。
index.jspは以下のようにします。
以下の画面が開くので「完了」を押します。
内部Webブラウザが起動され、以下のような画面が表示されます。
testとでも入力し、サブミットします。formタグのaction属性がTestServletなのでそれに対応するServletが実行されます。
今回の場合、TestServletに対応するのはweb.xmlに記載されているjp.co.confrage.TestServletのdoPostメソッドになります。
index.jspは以下のようにします。
<%@ page language="java" contentType="text/html; charset=UTF-8"
    pageEncoding="UTF-8"%>
<!DOCTYPE html PUBLIC "-//W3C//DTD HTML 4.01 Transitional//EN"
    "http://www.w3.org/TR/html4/loose.dtd">
<html>
<head>
<meta http-equiv="Content-Type" content="text/html; charset=UTF-8">
<title>servlet_test</title>
</head>
<body>
<form action="TestServlet" method="POST">
<input type="text" name="input">
<input type="submit" value="送信">
</body>
</html>
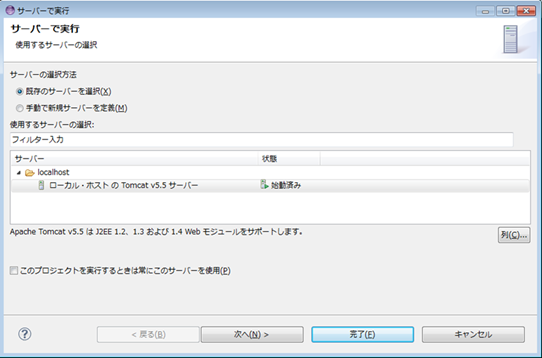
index.jspをEclipseより実行します。index.jspを右クリックし、「実行」-「サーバーで実行」を選択します。以下の画面が開くので「完了」を押します。
サーバーで実行画面
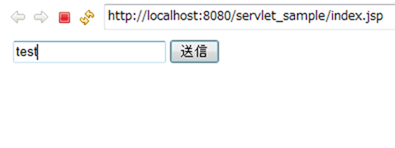
内部Webブラウザが起動され、以下のような画面が表示されます。
testとでも入力し、サブミットします。formタグのaction属性がTestServletなのでそれに対応するServletが実行されます。
今回の場合、TestServletに対応するのはweb.xmlに記載されているjp.co.confrage.TestServletのdoPostメソッドになります。
Information